Friday, November 17, 2017

Sitecore 9 QuickStarts - Getting Started With xConnect

The best place to get started with XConnect is using Martina's documentation. It walks you through your basic XConnect console application.

Once you have this console app building start taking a look at the Jason Wilkerson blog articles on XConnect. Although tempting, do NOT start with Jason's articles. It is important that you get Martina's application working first and then start adding functionality from Jason's articles. The reason is that Martina's will do all the client certificate stuff properly and that is what you want for production.

I started myself with this console app and am now using Jason's blog articles myself.  My hope is to build out a repository on GitHub along with a series of articles on how to integrate XConnect with a variety of other applications in hopes this will save others time doing this.  If you are building an integration maybe we can collaborate and then add it to the repository for others to use.

When you create your project in Visual Studio 2017, if it defaults to creating your console app as 4.6.1 and you switch to 4.6.2 you may get an error about the root node.  If you do it is a bug in the conversion.  Check your app.config file and make sure it is formatted like this.  In my case it removed the configuration node and put startup within appSettings.

<?xml version="1.0" encoding="utf-8"?>
<configuration>
  <startup>
    <supportedRuntime version="v4.0" sku=".NETFramework,Version=v4.6.2"/>
  </startup>
  <appSettings>
    <add key="xConnectCertificateThumbprint" value="082FF77F7C87A93A3C5FE88CFB3DAB730DEF331A"/>
  </appSettings>
</configuration>

If you do not see the 4.6.2 option in Visual Studio 2017 then you need to install the developer pack

Troubleshooting

The error you may run into and in fact I did is, "Sitecore.XConnect.XdbCollectionUnavailableException: 'The HTTP response was not successful: Unauthorized' The StackExchange mentions these 3 causes:

  1. Your thumbprint or certificate is not properly installed so you are being blocked from connecting to xConnect
  2. Your application does not have access to the certificate (e.g. IIS user does not have permission)
  3. You did not execute the script in the installation guide Post-installation steps.
On first install I had forgot to run the execution script, doh. The second time around it was the second one but it was a step further it was not the certificate itself but a policy applied to my laptop by IT that was not allowing the root authority because I was generating a self-signed certificate on my development environment. Hopefully this will help you when you run into this issue.

If you are running into issues with 401 or 403 errors connecting to xConnnect then this article can help you troubleshooting the certificate issues. It is all about xConnect Security


Monday, November 13, 2017

The Glass is Half Empty - Why can I not get all children of type Image from the media library folder?

So here is the problem.  I have a component where the user assigns a media folder for say a photo gallery.  Now I simply want to pull in all images from beneath this folder. I was tempted to do this but it always returns null.

imageFolderItem.Children.OfType<Image>()

But why?  Well according to Sitecore Poutine (Corey Smith AKA Sitecorey) the Image represents an Image field not the Sitecore Image template.  So to accomplish this you would simply do the following:

Go to the definition of Image and copy the class.  Make your own class but call it ImageItem.
Now set the TemplateId to be the Id of the Image template in Sitecore.

    /// <summary>
    /// This is an item based on the image template. If you are after the field use Image.
    /// </summary>
    [SitecoreType(TemplateId = "{F1828A2C-7E5D-4BBD-98CA-320474871548}", AutoMap = true)]
    public class ImageItem : IgnitionViewModel
    {
        //
        // Summary:
        //     Gets or sets the alt.
        public string Alt { get; set; }
        //
        // Summary:
        //     Gets or sets the border.
        public string Border { get; set; }
        //
        // Summary:
        //     Gets or sets the class.
        public string Class { get; set; }
        //
        // Summary:
        //     Gets or sets the height.
        public int Height { get; set; }
        //
        // Summary:
        //     Gets or sets the H space.
        public int HSpace { get; set; }
        //
        // Summary:
        //     Gets the SRC.
        public string Src { get; set; }
        //
        // Summary:
        //     Gets or sets the V space.
        public int VSpace { get; set; }
        //
        // Summary:
        //     Gets or sets the width.
        public int Width { get; set; }
        //
        // Summary:
        //     Gets or sets the media id.
        public Guid MediaId { get; set; }
        //
        // Summary:
        //     Gets or sets the title.
        public string Title { get; set; }
        public Language Language { get; set; }
    }

Now your call can look like this:

     imageFolderItem.Children.OfType<ImageItem>());

And my Symposium 2017 Selfie pictures are returning.


I wish I had found this article a couple hours ago so if you have written one on this issue and have a better description on what the issue is and how to solve it comment here.  Hopefully this will help someone else with the issue.

Wednesday, November 8, 2017

Sitecore 9 QuickStarts: Installing Sitecore 9 In Development Environment

Installing Sitecore 9

Now that you are back from Sitecore Symposium and the announcement has been made you are likely wanting to get started installing it.  This article will help you get it set up and offer tips on places where you could run into issues.

WARNING: The focus of this blog on the local developer environment install and getting you started. If you are installing in any other environment you will want to follow a different set of instructions. If you need help with that let me know I would be glad to help personally or direct you to someone whom can help.

Just like my you are probably lazy and will want to follow the Lazy Way to Install Sitecore 9 and that is right. However before following the lazy way you need to download the right version. As of this article it is the Sitecore 9 Initial Release.


Once you have the Sitecore 9 downloaded, you will want to use Jeremy's Gist script.  This article explains how the Low Effort SOLR Install script works.

SPECIAL NOTE FOR Windows 8 or 10: If you have not already you will need to enable the Local Admin account. After you have done this you can create a local admin account for SOLR to run under as well as set up app pool users.

If you are new to SOLR, please be aware that SOLR is a Java technology so you will required to Install Java to run it. If after install SOLR will not start then you probably have to install Java. You can confirm this by opening a command prompt (Run as Administrator and then CD SOLR\solr-6.6.2\bin changing the version if you have a newer version of SOLR.  Then type solr start. You will get the error saying:

error: java.exe not found

If java is installed and still get the error check the path in your environment variables JAVA_HOME. Mine was set to the wrong path, an older version of Java.

You can confirm SOLR is running by going to the admin https://solr:8983/solr if you changed your port then this may be different but if you stuck with the defaults it should show the SOLR admin

Save yourself some time and get the pre-requisites installed:


  • Install Microsoft Web Platform Installer
  • Search for "Web Deploy 3.6 For Hosting Servers" make sure it is this version because if it does not say For Hosting Servers it will bite you later.
  • Install SIF. To do so open Windows Powershell ISE (Run as Administrator)
  • In console at the bottom run Register-PSRepository -Name SitecoreGallery -SourceLocation https://sitecore.myget.org/F/sc-powershell/api/v2
  • Then run Install-Module SitecoreInstallFramework 
  • Then ensure you have the latest by running Update-Module SitecoreInstallFramework


Once you have SOLR installed and the pre-requisites then follow the Lazy Way to Install Sitecore 9 I used the Rock Paper Scissors UI mentioned in the article as it will generate the scripts and run them if you would like.

When I installed the first time, I unchecked the checkbox so it would run automatically but then ran into issues with permissions writing to the host file. A better approach is to set the permissions on the host file then open Windows Powershell SPE (Run as Administrator) then in the command window enter this command:

Set-ExecutionPolicy RemoteSigned

After that then run the generated script.  This worked well for me. I have now copied Jeremy Davis' script along with Kam's to my R2D2 Unit for transport to any dev machine that needs it in the future.


Possible Issues and Troubleshooting

First Time Install

I mentioned a couple things inline in the install section but there are a few other things that may help you will resolving issues.

ISSUE: Error requesting 
http://xp0.sc/sitecore/admin/PopulateManagedSchema.aspx?indexes=all: The remote server returned an error: (500) 
POSSIBLE RESOLUTION: Check event log and in my case it said "Login failed for user 'collectionuser'. Reason: Could not find a login matching the name provided. [CLIENT: <local machine>]"  Now in my case I had to add that user to my database and ensure it had access to the proper permissions. If you are using another user for the collection user then you need to edit the connectionstring.config however note that there are now 2 connectionstring.config files.  The first in in App_Config but the other is in \App_data\jobs\continuous\IndexWorker\App_config\ConnectionStrings.config make sure you change both.

ISSUE: Error hitting xconnect in browser:
Handler "ExtensionlessUrlHandler-Integrated-4.0" has a bad module "ManagedPipelineHandler" in its module list
Now there is the normal spot in "Turn Windows Features On" for .NET 4.7 however there is also the other spot that is not as obvious place under "Turn Windows Features On" under "Internet Information Services > World Wide Web Services > Application Development Features" Navigate there and check ASP.NET 4.6

Re-Running The Install


Now if you ran the install and it failed, upon running it a second time you may run into other issues.
The first error you will get is:

 You must remove all users with password before setting the containment property to NONE.

The issue that the users cannot be deleted by the SIF process. the fix then open SQL Management Studio and delete the SQL Server user from the databases that were created. This stack exchange post describes it in detail.

If you need help installing Sitecore 9 let us know and we will be glad to help out. I myself have only installed it in a local dev environment at this point but I am sure I will be doing it in a cloud capacity before you know it as well.

If you are looking for a mentor to connect with you on a regular basis for Sitecore or any other technology, Read Watch Create can arrange an introduction. Email me at chris.williams@readwatchcreate.com and I can arrange for mentoring sessions at a reasonable rates.


Friday, September 1, 2017

The Sitecore Alphabet

The inaugural Alabama Sitecore User Group is September 13th and Corey Smith, Sitecore Architect and MVP, will be there to discuss Sitecore MVC from A-Z

This brought to mind the Sitecore Alphabet.  I will start with a few terms per letter and we can build this as we go, helping us all learn more about Sitecore and the various elements, features, terms and events in the community.

Hope this helps you on your learning journey down Alphabet Street.


Below is a list of terms for each letter.  Eventually they will all be linked.

A

B

C

D

E

F

  • FakeDb
  • FXM

G

  • Globalization
  • Glass Mapper
  • GitHub

H

  • Habitat
  • Helix
  • Hackathons
  • Html
  • HedgeHog - Known for TDS and RAZl listed seperately
  • Houston Sitecore User Group
  • Hyderabad Sitecore User Group

I

  • India Sitecore User Group
  • Ignition
  • Information Architecture

  • Jaipur Sitecore User Group
  • Jordan Sitecore User Group

K

  • Kansas City / Overland Park Sitecore User Group

L

  • Lehigh Valley Sitecore User Group
  • London Sitecore User Group
  • Los Angeles Sitecore User Group
M

  • Mauritius Sitecore User Group
  • Melbourne Sitecore User Group
  • Mikwaukee Sitecore User Group
  • Minneapolis Sitecore User Group
  • Mumbai Sitecore User Group

N

  • Nederland Sitecore User Group
  • Nagpur - India Sitecore User Group
  • New England Sitecore User Group
  • New York Metro User Group
O

  • Orlando Sitecore User Group
  • Ottawa Sitecore User Group
P

  • Pakistan Sitecore User Group
  • Philadelphia Sitecore User Group
  • Portland Sitecore User Group
  • Poland Sitecore User Group
  • Pune Sitecore User Group
Q

  • Quebec Sitecore User Group
  • Queen City Sitecore User Group
R

  • Romania Sitecore User Group
S

  • Serbia Sitecore User Group
  • Spain Sitecore User Group
  • Sri Lanka Sitecore User Group
  • Switzerland Sitecore User Group
  • Sydney Sitecore User Group
T
U

  • UAE-Dubai Sitecore User Group (SUGUAE)
  • Ukraine Sitecore User Group
V
W
X
Y
Z

Friday, July 28, 2017

Introducing the Sitecore Commerce Mentoring Guild

There are a lot of us learning Sitecore Commerce and we are all at various stages.  The core thing we share is we are all learning it.  To help us all get ramped up on it quickly and efficiently, Eric Stafford and I have established a Sitecore Commerce Mentoring Guild Page and a Sitecore Commerce Mentoring Guild Group.

The page will feature some notes, posts, and events where we can share public information.  The group allows us a place to ask each other questions, provide some info on what we are working on, where we are struggling and things we can use to help.

As more people join and we gain more momentum, I would love to have a github where we could share snippets, powershells, and more advanced stuff together on it.

Eric and I have created the initial spark.  We look forward to the community creating the fire that will push us with much force into the new era.

Also if you are on Sitecore Slack then please add the #ecommerce channel.

Tuesday, June 20, 2017

How To Check If An Item Has Publishing Restrictions

If you have items that are appearing in master and in web but on the website you get a 404 then you may want to check publishing restrictions. Here is how you do it.


  1. Log into the Sitecore Admin
  2. Click on Content Editor
  3. At the top Click on View then ensure Standard Fields is checked

  4. Now on find the content item you are having issues with and click on it.
  5. On the right hand panel scroll down and you will see a publishing section. Expand it and make sure there are no values set on these fields. If there are dates it will only display within that range.

  6. Now the other thing to check is at the very bottom of this section. If this checkbox is published then it will not publish ever.

  7.  Now the other place to check is Workflow Section. If this item is in a workflow state it will not display either but in this case it should not be in the Web database either.

If the item exists in master and not in web then the other thing you can try is publish the parent node.  When publish finishes you can expand the details on the dialog and it will tell you if something was pushed or not.

If you are still experiencing this issue feel free to email me at chris.williams@readwatchcreate.com and I will assist as much as I can. 


Tuesday, May 23, 2017

Exporting the username and custom properties from Sitecore using Powershell

I found a great article on exporting users from Sitecore and it did 90% of what I needed. It showed how to export the custom properties but what was missing was the username.  Read the article for more details on how the export works as it is a really good article.

I am simply going to give you the additional field in bold below as this will give you the username in the form {domain}\{user} eg. sitecore\admin:

$property = @(
"Name",
@{Name='Email';Expression={ $PSItem.Profile.GetCustomProperty('Email') }},
@{Name='FirstName';Expression={ $PSItem.Profile.GetCustomProperty('FirstName') }},
@{Name='LastName';Expression={ $PSItem.Profile.GetCustomProperty('LastName') }},
@{Name='Title';Expression={ $PSItem.Profile.GetCustomProperty('Title') }},
@{Name='Company';Expression={ $PSItem.Profile.GetCustomProperty('Company') }},
@{Name='Country';Expression={ $PSItem.Profile.GetCustomProperty('Country') }},
@{Name='ZipCode';Expression={ $PSItem.Profile.GetCustomProperty('ZipCode') }},
@{Name='Department';Expression={ $PSItem.Profile.GetCustomProperty('Department') }},
@{Name='Street';Expression={ $PSItem.Profile.GetCustomProperty('Street') }},
@{Name='City';Expression={ $PSItem.Profile.GetCustomProperty('City') }},
@{Name='Phone';Expression={ $PSItem.Profile.GetCustomProperty('Phone') }},
@{Name='Username';Expression={ $PSItem.Profile.GetCustomProperty('Username') }},
)

# Gets not disabled extranet users, next select all custome properties and save all properties to CSV file
Get-User -Filter 'extranet\*'  `
    | Where-Object { $_.Profile.State -ne 'Disabled' } `
        |  Select-Object -Property $property `
            | Export-CSV -Path "$apppath\extranet-enabled-uc.csv" -notype -encoding "unicode"
       
Download-File  "$apppath\extranet-enabled-uc.csv"


Hopefully you will find this helpful. Thanks Robert Senktas for the article it helped get me 90% there. If you have tips tricks or resources you would like to share please let me know and I will post them here.

Thursday, April 20, 2017

Coveo free edition for Salesforce Is Now Here

Welcome Salesforce to the community.  In the Sitecore community we have known about Coveo and all its wonders for years. Now you can take advantage of it too.  Find out more in this article on Coveo Debuts free AI Powered Search for Salesforce.


We are so excited about this as you should too.

Sunday, April 16, 2017

Sitecore Commerce QuickStart

Today is the start of my Sitecore Commerce Journey.  As I go through the process I will document so as you start your journey it will help you get started quicker.

Before you even start to download, save yourself some time and check out the Sitecore Commerce compatibility table this will ensure you have the proper version of everything to start. Installing the wrong version of something can really mess up the environment and you may even have to start over so save yourself some time.

The official Sitecore Commerce Quick Deployment guide will help you on your first set up of the development environment. This is what I am following for my environment however for a production deploy, you will need to plan out which types of servers you need and that will complicate things.

Not only do you need a CD/CM environment for production but depending on traffic you may need a multiple commerce servers with different roles (Author, Shops, Minions and DevOps)  I highly recommend you read through the Developers Guide at least once to get a good idea on all the moving parts.

While the installs are happening you may want to open these in your browser. They provides some really good information on how the various moving parts fit together.

  • Digesting Sitecore By Grant Killian - Tip: You may want to print out the Sitecore Commerce Diagram he provides as it gives you a Visual on the various parts and how they fit. I have a copy beside me and it helps a lot when reading the documentation.
  • Sitecore Commerce 8.2.1 Technical Architecture First Look By Andrew Crowder - Tip: You may want to print out his diagram beneath the text "Designed for a modern cloud-based micro-services world" as well.  Having these 2 diagrams beside me has really helped with my understanding of Sitecore Commerce at a high level and I am sure they will help as I did deeper too.

Step 1: Install .NET Related Prerequisites

The first step is installing the proper .NET related items:
.NET Framework 4.6.1 SDK
ASP.NET MVC 4 or later
ASP.NET Core 1.0.3

In my case, I installed Visual Studio 2017 so it installed all this stuff for me.

Step 2: Install Sitecore 8.2 Update-3 

The second step is installing Sitecore 8.2 Update-3 which is a simple process if you have done it before. If not then let me know and I can direct you to plenty of good articles on installing.

Step 3: Create the Local Admin Account for Commerce Server

During this step you create the local service account.  The default is CSFndRuntimeUser.

VERY IMPORTANT:You need to ensure it has SysAdmin access to SQL Server and is admin on the app pool for your sitecore instance.

If you are on Windows 10 or one of the other operating systems that insist on an email address, you have to use a more hidden method to Create your local admin account

Step 4: Install Commerce Server

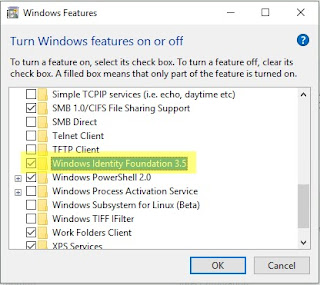
Before installing Commerce Server be sure to double check that the windows identity feature is installed. If you run the install and it is not, you will get prompted.


This can be done by clicking the start menu and then searching for "Server Manager". If you are running Windows 10 that does not return anything so search for "Turn Windows Features On or Off".
You should then be able to check the feature so it is enabled and click OK


Now run the Commerce Server Install. Make sure to choose Run As Administrator.  When prompted for the SQL Server instance name it will default to the server name so if you are running SQL Express you probably have a different instance name.  Make sure you test the connection before clicking next.

Step 4: All The Manual Configuration Goodness


TIP: For those good with Powershell, this may be a great opportunity to generate a script for these tasks so you don't have to manually do this every time. Especially when tearing down and recreating demo environments.


  • Create a folder named C:\inetpub\CSServices\
  • In IIS, add a new website named CSServices, with the physical path pointing to the folder that you previously created.
  • Make sure this IIS site listens on port 1004, which will be used in a later stage.
  • Create a new app pool "CSServices", and set its identity to .\CSFndRuntimeUser
  • Depending on your IIS hostname binding, you may need to disable the loop back check. Please refer to http://support.microsoft.com/kb/896861 for more details.

Step 5: Install Sitecore Packages


Tip: These packages are large so you can save time by copying them into your /data/packages folder under your sitecore instance that way you can just choose a package rather than uploading it.

Step 6: Install Sitecore Update Packages


Tip: Still say this is something that a powershell script could automate. If anyone creates them let me know and I will link to them from here.

http://<your site>/sitecore/admin/UpdateInstallationWizard.aspx

There is a specific order to be followed when installing so make sure you do so or you will run into quirky issues.

WARNING: The QuickStart tells you to install the update packages but do NOT install the last package until after completing Step 7 or it will throw the exception below

[CommerceException: -2146232832, Commerce Server Configuration, 5, Commerce Server Configuration, Invalid Site Name: CFSolutionStorefrontSite
SiteConfigReadOnly:Initialize]
   System.Runtime.Remoting.Proxies.RealProxy.HandleReturnMessage(IMessage reqMsg, IMessage retMsg) +14493634
   System.Runtime.Remoting.Proxies.RealProxy.PrivateInvoke(MessageData& msgData, Int32 type) +388
   CommerceServer.Core.Configuration.ISiteConfigReadOnly.Initialize(String bstrSiteName) +0
   CommerceServer.Core.Runtime.Configuration.CommerceResourceCollection..ctor(String siteName) +190

[CommerceException: There was a problem reading the site resources from the Commerce Server administration database for the site 'CFSolutionStorefrontSite'.  Please check that resources exist for the site and that the process has permission to access the database.  The InnerException contains more details.]
   CommerceServer.Core.Runtime.Configuration.CommerceResourceCollection..ctor(String siteName) +876
   CommerceServer.Core.Runtime.CommerceApplicationModule.InitializeApplication() +482
   CommerceServer.Core.Runtime.CommerceApplicationModule.Init(HttpApplication appInstance) +139
   Sitecore.Commerce.Connect.CommerceServer.Pipelines.CommerceBaseModuleProcessor`1.Init(PipelineArgs args) +150

If you end up installing the package, then you can simply disable the \App_Config\CommerceServer.Core.Config by renaming it with .disabled on the end. Once you complete step 7 then you can go back and install the last update package.

Thanks Hao Liu for explaining the issue and one way to get around it.

After installing all the update packages, if you get this error:

-2147467259, Commerce Server Configuration, Cannot open database "MSCS_Admin" requested by the login. The login failed.
SiteConfigReadOnly:Initialize

Then it means you need to check back to Step 3 where you were ask give the app_pool user (default CSFndRuntimeUser) SysAdmin on SQL Server.

Commerce Server stores the connection strings for the Administration database and other Commerce databases in the registry by default.  You can store this info in your web.config or app_config files.

Here is the orignial link to Connecting to the Administration database

<connectionStrings>
    <add name="ADMINDBPS" connectionString="<your MSCS_Admin connection string" />
</connectionStrings>

Step 7: Set up a Commerce Server site


Tuesday, April 11, 2017

Raspberry PI QuickStarts

I got my Raspberry PI last week and already I have started doing lots of things on it. I have started a blog to help others starting out.  It contains a series of QuickStarts to help you get started on a task fast and correctly.  

If you just got a Raspberry PI or are struggling through a task check out my Rasbperry PI Guild Blog and if I have not blogged about your task or issue email me. I would love to assist.

Sunday, March 12, 2017

Getting Started With Sitecore Data Exchange 1.3

I played with Sitecore Data Exchange version 1.3 this weekend and it is pretty awesome.  The best way to get started is to read Fenil Jacob's RSS Feed Provider for Sitecore Data Exchange article.

This article will walk you through installing Sitecore Data Exchange as well as provide you with a fully working and very useful Sitecore Data Exchange Provider.

1.4 Is On The Way

If you are looking at using Sitecore Data Exchange for production and are writing custom providers, you should watch this Sneak Preview on Sitecore Data Exchange 1.4 to ensure you are ready to take advantage of the new stuff in 1.4.

Checking Status and Debugging

When you run the pipeline batch note that there is a field on it called messages. This will show you any log messages associated with the run. This is a good way to see if it is running properly or throwing errors. For this RSS Feed Provider the messages would be on this item:

/sitecore/system/Data Exchange/RSS Feed Provider Tenant/Pipeline Batches/Synch RSS Feeds to Sitecore Items Pipeline Batch

You can debug using Visual Studio simply by attaching to the IIS Process much like you would with your Sitecore Website.

Adding Your Own Feeds

If you are going to be working with your own RSS Feeds in the example, you need to add your own feeds under /sitecore/system/Data Exchange/RSS Feed Provider Tenant/Endpoints/Providers/RSS Feed and delete or reuse their existing one.  

Make sure you add the steps for your feed(s) under here for any new feeds you added under the endpoints.

/sitecore/system/Data Exchange/RSS Feed Provider Tenant/Pipelines/Read RSS Feed Info from RSS Feed Pipeline

If you fail to add the feed you will get this error message:

ERROR Pipeline step processing will abort because mapping set failed.

RSS Feed Provider vs Official Implementing A Provider Documentation

From reviewing the code and attempting to create my own provider I noticed a few differences in the RSS Provider compared to the Official documentation on implementation. I have documented those here. I am not sure if this was intentional or not. I will check with the author of the provider and add notes here.


  1. The endpoint for the RSS Feed Provider has a base of template whereas the documentation says to use /sitecore/templates/Data Exchange/Framework/Endpoints/Endpoint
  2. In section 5.1 of the official documentation it says to create a template based on the template Templates > Data Exchange > Framework > Pipeline Steps > Pipeline Step however the actual template is Templates > Data Exchange > Framework > Pipeline Steps > Base Pipeline Step 
  3. In section 5.1 of the official documentation it says to add Short Description. I didn't see that field.


Have fun with the Sitecore Data Exchange. If you are doing cool things with Sitecore Data Exchange let me know and I will check it out. Also if you run into issues with Sitecore Data Exchange let me know too and I will help as much as I can.