Saturday, October 5, 2013

Sitecore QuickStart: Create Visual Studio Project

In Sitecore Training you learned how to create a Visual Studio Project for your Sitecore Instance.  This is an awesome start for your first project, however as you start to share functionality across projects, create your own modules, or start working in a multiple sites per instance scenario, you may need multiple projects per instance.

In the solutions I have architected, I generally will leave the Sitecore instance as is and create projects in their own projects folder.  These projects can then be deployed to the sitecore instance as needed by copying over the dll and any layouts, sublayouts etc.  Architecting the Content Tree and Physical Folders will be in a future QuickStart.

In this blog article, I will be creating a Visual Studio Project that could be used for a single site within the Sitecore Instance.

Step 1: Create a Visual Studio Class Library.

Click on the File Menu and Click New and then Project 


On the left panel ensure you have clicked Windows then on the right click Class Library.  Name your project and directory to store your project.

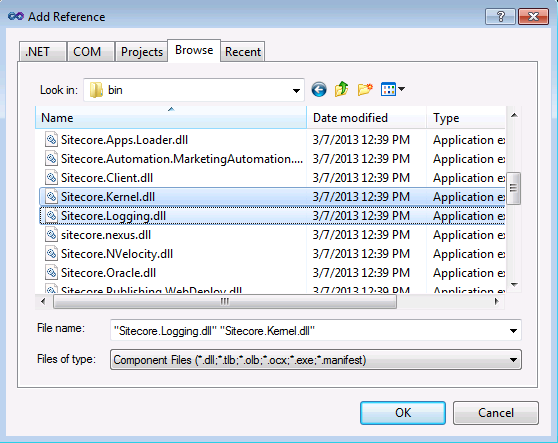
Step 2: Add References To Sitecore Kernel and Sitecore Logging

In the Solution Explorer Panel, Right click on References then click on Add Reference...

Click on the browse tab and navigate to the bin folder of your sitecore instance.  Select the Sitecore Kernel and Sitecore Logging DLLs.  Alternatively you could place these dlls in a shared folder.  Click OK to Add References.


Add References to your project for System.Web 


Step 3: Create folders for your Sitecore Components
NOTE: This is a very basic folder structure.  Your project may have a more sophisticated structure to represent your solution. However the concept of deployment on build is the same.


STEP 4: Add Build Events

Right click on your project and click on properties


Click on Build Events

In the Post-build events command line paste the following.  

xcopy "$(ProjectDir)Layouts" "C:\inetpub\wwwroot\SitecoreQuickStart\Website\Layouts" /s /I /y
xcopy "$(ProjectDir)Renderings" "C:\inetpub\wwwroot\SitecoreQuickStart\Website\Renderings" /s /I /y
xcopy "$(ProjectDir)Sublayouts" "C:\inetpub\wwwroot\SitecoreQuickStart\Website\Sublayouts" /s /I /y
xcopy "$(ProjectDir)bin\debug\SitecoreQuickStart*.pdb" "C:\inetpub\wwwroot\SitecoreQuickStart\Website\bin" /s /I /y
xcopy "$(ProjectDir)bin\debug\SitecoreQuickStart*.dll" "C:\inetpub\wwwroot\SitecoreQuickStart\Website\bin" /s /I /y

NOTE: Change SitecoreQuickStart to your project name.  You may need to add more dlls to copy, however do not be tempted to do a *.dll as you may end up overwriting other versions of dlls in the Sitecore Instance.  It is better practice to only copy over the dlls you require.  Also, we are copying the Layouts folder to the Sitecore Layouts folder directory.  For larger projects it is better to create subfolders beneath the layouts folder unless the Layouts are needed for Sitecore Admin Applications, but that will be discussed in a future post on creating Sitecore Admin Applications.

STEP 5: Compile Your Solution

From the Build Menu Choose to Build Solution.  Once completed it should have copied your Sitecore Components to the Sitecore Instance or reported errors in the error list.

Now that your Sitecore Project is set up, the next step is to create your Sitecore Components in the Sitecore Content Tree.




Sitecore How-To: Set the Data Source Property of a Sublayout

The Data Source property of a Sublayout is used when the sublayout needs to use a content item other than the current item.

For example, you may have a landing page with various callouts to other content. These content items would exist in other parts of the tree. For these callout Sublayouts you would not want them accessing the current page item, you would want them pointing at another object that would store the callout title, image and link.

Here are the steps to set the data source on a sublayout on a page.
  1. Login To Sitecore and open the content editor
  2. Navigate to the page you want to edit
  3. Click on Presentation -> Details in the top menu
  4. In the Details Panel click on Edit
  5. Click on Controls to see the list of sublayouts
  6. Click on the Sublayout you want to change the data source for
  7. Click on the data source field. You can either manually enter the path or click browse to choose the content path from the tree dialog
  8. Click ok to save
  9. Click ok to close all the other dialogs


Friday, September 13, 2013

Toronto Sitecore User Group on DMS

The Toronto Sitecore Technical User Group is on September 25, 2013 at EQ Works.

For this meeting we have used http://launchsitecore.net as a starting point and made a few changes to the website. We would appreciate it if you could hit http://tsug.nonlinear.ca to generate some DMS/personalization data.

 If you are able to attend please register at: Sitecore User Group Registration

Wednesday, August 28, 2013

Sitecore 7 Initial Release Now Available


This is very exciting news for a lot of reasons.  First of all, my new laptop is running Windows 8 so I was forced to run Sitecore 6.6 on a VM on my laptop rather than natively.  

Hello Sitecore Enthusiast!

Sitecore is pleased to announce the availability of Sitecore 7. Sitecore can scale to massive amounts of content, and allow users to search, filter and target that content in more sophisticated ways than ever before.
 
Sitecore 7.0 rev. 130424 Major Features and Highlights:
  • Item Buckets for large scale storage of content without a tree structure
  • Faceted Search
  • Tagging and Bulk Operations
  • Boosting Rules
  • New Search Screens for content authors in the Content Editor, Page Editor, and in many dialog boxes.
  • LINQ to Provider
  • Datasource Queries and GUID/LinkDatabase Datasources
  • DocumentMapping 
  • A new Sitecore.ContentSearch namespace that contains new indexing and search APIs.
  • Support for .NET 4.5
Support for running Sitecore on Windows Server 2012 and Windows 8.  

Saturday, June 29, 2013

Sitecore How-To: Sitecore Country and Region Dropdowns

We had a couple people in the Guild ask about country and region DropDownLists so thought Dennis Augustine and I thought we would write an article on it.  

Problem: In our application we require a country and region picker.  When someone chooses a company we need to filter the region picker.

Solution: This can be accomplished by adding two DropDownList controls to your SubLayout. Call one ddlCountry and the other ddlRegion.  

In the content tree under a shared lookup area create a folder called "Country"  under this folder add the countries with key as country code and phrase as country name.  Next under each country create a folder called "Regions" store all the regions in this folder.  I use DictionaryEntry as my Sitecore Data Template for the country and regions.

On Page_load you would call GetCountries() and assign it to the ddlCountries.DataSource Property.

    protected override void OnLoad(EventArgs e)
    {
       ddlCountry.DataSource = GetCountries(); 
       ddlCountry.DataValueField = "Key"; 
       ddlCountry.DataTextField = "Phrase"; 
       ddlCountry.DataBind(); 
   }

Next trap the change in country using the following event:

protected void ddlCountry_SelectedIndexChanged(object sender, EventArgs e)
    {
            ddlRegion.DataSource = GetRegions(ddlCountry.SelectedValue); 
            ddlRegion.DataValueField = "Key"; 
            ddlRegion.DataTextField = "Phrase";  
           ddlRegion.DataBind(); 
    }

Next add the following code to the sublayout. Ideally later you would store these in a library for use late in other parts of your code. Also note that you would need to change "SiteSettings.LookupPath" to the path where you are storing your countries in the tree.  This setting occurs a couple times in my code below.

///<summary> 
/// Getting children items by parent item path 
///</summary> 
/// <param name="itemPath"></param> 
/// <returns>List<LookupItem></returns> 
public static List<LookupItem> GetLookupItemChildren(string itemPath) 
{ 
Item item = Sitecore.Context.Database.Items[itemPath]; 
List<LookupItem> lst = new List<LookupItem>(); 

if (item != null) 
{ 
foreach (Item child in item.Children) 
{ 
lst.Add( new LookupItem(child["Key"], child["Phrase"],child["AlternatePhrase"])); 
} 
} 

return lst; 
} 

///<summary> 
/// Getting Countries by Countries 
///</summary> 
public static List<LookupItem> GetCountries() 
{ 
return Lookups.GetLookupItemChildren(SiteSettings.LookupsPath + "/Country"); 
} 

///<summary> 
/// Getting Regions By Country KEY 
///</summary> 
public static List<LookupItem> GetRegions(string countryKey) 
{ 
Item item = Lookups.GetItemByKey(SiteSettings.LookupsPath + "/Country", countryKey);
return Lookups.GetLookupItemChildren(SiteSettings.LookupsPath + "/Country/" + item.Name + "/Regions"); 
} 

In Sitecore 7 you can replace these item lookups with LINQ statement.

Dennis Augustine has now created and uploaded the Country Region Dropdown Sitecore Module based on the blog post and it is now available in the Sitecore MarketPlace as a Development Accelerator.

If you have any questions or any tips, tricks or resources you would like to share with the Guild please email me at chris.williams@threepointturn.com or dennis.augustine@threepointturn.com 

Sunday, June 9, 2013

Google Chrome and the 301 Redirect Cache or Why are my 301 Redirects not hitting my server

301 Redirects are important to maintain search rankings and help users with browser bookmarks still find the right location on your site.
                 
This article helps you build your own 301 redirect handler for Sitecore: Create the ultimate 301 Redirect Handler for Sitecore

PROBLEM: Recently while building it myself I found an interesting but/feature of chrome.  When I was debugging my 301 redirect handler the first time I hit the URL it hit my breakpoint and I could debug the update however when I hit it again it redirected without hitting my handler. It turns out this is a feature of chrome.  Since the 301 is a permanent redirect, Chrome remembers the redirect and caches it.
Here is an article that explains it more: Google Chrome Caches 301 Redirects

SOLUTION: There are actually two possible solutions:
  1. Debug in Internet Explorer and FireFox and once working use Chrome once to ensure it redirects.
  2. Chrome has a way of turning this feature off How Can I Make Chrome Stop Caching Redirects
Hope it helps someone else in the Guild avoid the same issue.

If you have a tip, trick or resource you would like to share with the guild please email me at chris.williams@threepointturn.com

Tuesday, June 4, 2013

Toronto Sitecore User Group June 19,2013 will be be DMS 101

If you are in the Toronto area on June 19th, you may wish to register for the Toronto Sitecore User Group.
The topic will be DMS 101.  

Register at: http://toronto-sitecore-user-group.eventbrite.ca/#

Look forward to seeing the Guild Members there.