Welcome Salesforce to the community. In the Sitecore community we have known about Coveo and all its wonders for years. Now you can take advantage of it too. Find out more in this article on Coveo Debuts free AI Powered Search for Salesforce.
We are so excited about this as you should too.
Thursday, April 20, 2017
Sunday, April 16, 2017
Sitecore Commerce QuickStart
Today is the start of my Sitecore Commerce Journey. As I go through the process I will document so as you start your journey it will help you get started quicker.
Before you even start to download, save yourself some time and check out the Sitecore Commerce compatibility table this will ensure you have the proper version of everything to start. Installing the wrong version of something can really mess up the environment and you may even have to start over so save yourself some time.
The official Sitecore Commerce Quick Deployment guide will help you on your first set up of the development environment. This is what I am following for my environment however for a production deploy, you will need to plan out which types of servers you need and that will complicate things.
Not only do you need a CD/CM environment for production but depending on traffic you may need a multiple commerce servers with different roles (Author, Shops, Minions and DevOps) I highly recommend you read through the Developers Guide at least once to get a good idea on all the moving parts.
While the installs are happening you may want to open these in your browser. They provides some really good information on how the various moving parts fit together.
In my case, I installed Visual Studio 2017 so it installed all this stuff for me.
VERY IMPORTANT:You need to ensure it has SysAdmin access to SQL Server and is admin on the app pool for your sitecore instance.
If you are on Windows 10 or one of the other operating systems that insist on an email address, you have to use a more hidden method to Create your local admin account

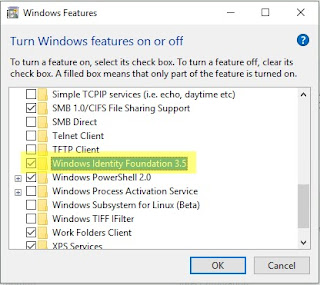
This can be done by clicking the start menu and then searching for "Server Manager". If you are running Windows 10 that does not return anything so search for "Turn Windows Features On or Off".
You should then be able to check the feature so it is enabled and click OK
TIP: For those good with Powershell, this may be a great opportunity to generate a script for these tasks so you don't have to manually do this every time. Especially when tearing down and recreating demo environments.
Tip: These packages are large so you can save time by copying them into your /data/packages folder under your sitecore instance that way you can just choose a package rather than uploading it.
Tip: Still say this is something that a powershell script could automate. If anyone creates them let me know and I will link to them from here.
http://<your site>/sitecore/admin/UpdateInstallationWizard.aspx
There is a specific order to be followed when installing so make sure you do so or you will run into quirky issues.
WARNING: The QuickStart tells you to install the update packages but do NOT install the last package until after completing Step 7 or it will throw the exception below
If you end up installing the package, then you can simply disable the \App_Config\CommerceServer.Core.Config by renaming it with .disabled on the end. Once you complete step 7 then you can go back and install the last update package.
Thanks Hao Liu for explaining the issue and one way to get around it.
After installing all the update packages, if you get this error:
-2147467259, Commerce Server Configuration, Cannot open database "MSCS_Admin" requested by the login. The login failed.
Then it means you need to check back to Step 3 where you were ask give the app_pool user (default CSFndRuntimeUser) SysAdmin on SQL Server.
Commerce Server stores the connection strings for the Administration database and other Commerce databases in the registry by default. You can store this info in your web.config or app_config files.
Here is the orignial link to Connecting to the Administration database
<connectionStrings>
<add name="ADMINDBPS" connectionString="<your MSCS_Admin connection string" />
</connectionStrings>
Before you even start to download, save yourself some time and check out the Sitecore Commerce compatibility table this will ensure you have the proper version of everything to start. Installing the wrong version of something can really mess up the environment and you may even have to start over so save yourself some time.
The official Sitecore Commerce Quick Deployment guide will help you on your first set up of the development environment. This is what I am following for my environment however for a production deploy, you will need to plan out which types of servers you need and that will complicate things.
Not only do you need a CD/CM environment for production but depending on traffic you may need a multiple commerce servers with different roles (Author, Shops, Minions and DevOps) I highly recommend you read through the Developers Guide at least once to get a good idea on all the moving parts.
While the installs are happening you may want to open these in your browser. They provides some really good information on how the various moving parts fit together.
- Digesting Sitecore By Grant Killian - Tip: You may want to print out the Sitecore Commerce Diagram he provides as it gives you a Visual on the various parts and how they fit. I have a copy beside me and it helps a lot when reading the documentation.
- Sitecore Commerce 8.2.1 Technical Architecture First Look By Andrew Crowder - Tip: You may want to print out his diagram beneath the text "Designed for a modern cloud-based micro-services world" as well. Having these 2 diagrams beside me has really helped with my understanding of Sitecore Commerce at a high level and I am sure they will help as I did deeper too.
Step 1: Install .NET Related Prerequisites
The first step is installing the proper .NET related items:
.NET Framework 4.6.1 SDK
ASP.NET MVC 4 or later
ASP.NET Core 1.0.3
In my case, I installed Visual Studio 2017 so it installed all this stuff for me.
Step 2: Install Sitecore 8.2 Update-3
The second step is installing Sitecore 8.2 Update-3 which is a simple process if you have done it before. If not then let me know and I can direct you to plenty of good articles on installing.Step 3: Create the Local Admin Account for Commerce Server
During this step you create the local service account. The default is CSFndRuntimeUser.VERY IMPORTANT:You need to ensure it has SysAdmin access to SQL Server and is admin on the app pool for your sitecore instance.
If you are on Windows 10 or one of the other operating systems that insist on an email address, you have to use a more hidden method to Create your local admin account
Step 4: Install Commerce Server
Before installing Commerce Server be sure to double check that the windows identity feature is installed. If you run the install and it is not, you will get prompted.
This can be done by clicking the start menu and then searching for "Server Manager". If you are running Windows 10 that does not return anything so search for "Turn Windows Features On or Off".
You should then be able to check the feature so it is enabled and click OK

Now run the Commerce Server Install. Make sure to choose Run As Administrator. When prompted for the SQL Server instance name it will default to the server name so if you are running SQL Express you probably have a different instance name. Make sure you test the connection before clicking next.
Step 4: All The Manual Configuration Goodness
TIP: For those good with Powershell, this may be a great opportunity to generate a script for these tasks so you don't have to manually do this every time. Especially when tearing down and recreating demo environments.
- Create a folder named C:\inetpub\CSServices\
- In IIS, add a new website named CSServices, with the physical path pointing to the folder that you previously created.
- Make sure this IIS site listens on port 1004, which will be used in a later stage.
- Create a new app pool "CSServices", and set its identity to .\CSFndRuntimeUser
- Depending on your IIS hostname binding, you may need to disable the loop back check. Please refer to http://support.microsoft.com/kb/896861 for more details.
Step 5: Install Sitecore Packages
Tip: These packages are large so you can save time by copying them into your /data/packages folder under your sitecore instance that way you can just choose a package rather than uploading it.
Step 6: Install Sitecore Update Packages
Tip: Still say this is something that a powershell script could automate. If anyone creates them let me know and I will link to them from here.
http://<your site>/sitecore/admin/UpdateInstallationWizard.aspx
There is a specific order to be followed when installing so make sure you do so or you will run into quirky issues.
WARNING: The QuickStart tells you to install the update packages but do NOT install the last package until after completing Step 7 or it will throw the exception below
[CommerceException: -2146232832, Commerce Server Configuration, 5, Commerce Server Configuration, Invalid Site Name: CFSolutionStorefrontSite
SiteConfigReadOnly:Initialize]
   System.Runtime.Remoting.Proxies.RealProxy.HandleReturnMessage(IMessage reqMsg, IMessage retMsg) +14493634
   System.Runtime.Remoting.Proxies.RealProxy.PrivateInvoke(MessageData& msgData, Int32 type) +388
   CommerceServer.Core.Configuration.ISiteConfigReadOnly.Initialize(String bstrSiteName) +0
   CommerceServer.Core.Runtime.Configuration.CommerceResourceCollection..ctor(String siteName) +190

[CommerceException: There was a problem reading the site resources from the Commerce Server administration database for the site 'CFSolutionStorefrontSite'.  Please check that resources exist for the site and that the process has permission to access the database.  The InnerException contains more details.]
   CommerceServer.Core.Runtime.Configuration.CommerceResourceCollection..ctor(String siteName) +876
   CommerceServer.Core.Runtime.CommerceApplicationModule.InitializeApplication() +482
   CommerceServer.Core.Runtime.CommerceApplicationModule.Init(HttpApplication appInstance) +139
   Sitecore.Commerce.Connect.CommerceServer.Pipelines.CommerceBaseModuleProcessor`1.Init(PipelineArgs args) +150
If you end up installing the package, then you can simply disable the \App_Config\CommerceServer.Core.Config by renaming it with .disabled on the end. Once you complete step 7 then you can go back and install the last update package.
Thanks Hao Liu for explaining the issue and one way to get around it.
After installing all the update packages, if you get this error:
-2147467259, Commerce Server Configuration, Cannot open database "MSCS_Admin" requested by the login. The login failed.
SiteConfigReadOnly:Initialize
Then it means you need to check back to Step 3 where you were ask give the app_pool user (default CSFndRuntimeUser) SysAdmin on SQL Server.Commerce Server stores the connection strings for the Administration database and other Commerce databases in the registry by default. You can store this info in your web.config or app_config files.
Here is the orignial link to Connecting to the Administration database
<connectionStrings>
<add name="ADMINDBPS" connectionString="<your MSCS_Admin connection string" />
</connectionStrings>
Step 7: Set up a Commerce Server site
Tuesday, April 11, 2017
Raspberry PI QuickStarts
I got my Raspberry PI last week and already I have started doing lots of things on it. I have started a blog to help others starting out. It contains a series of QuickStarts to help you get started on a task fast and correctly.
If you just got a Raspberry PI or are struggling through a task check out my Rasbperry PI Guild Blog and if I have not blogged about your task or issue email me. I would love to assist.
If you just got a Raspberry PI or are struggling through a task check out my Rasbperry PI Guild Blog and if I have not blogged about your task or issue email me. I would love to assist.
Subscribe to:
Posts (Atom)