The next Toronto Sitecore Users Group April 3 at Non-Linear Creations.
Register Here
Look forward to seeing you there :)
Thursday, March 14, 2013
Tuesday, March 12, 2013
QuickStart: Resource Strings
When planning the Sitecore Content Tree Architecture it makes sense to place some content on a page. Other times it makes sense to create Generic Content items that would store blocks of content in a shared location. This content could be used across pages. Other times there are content items such as Form Labels, static text for instructions. These need translations, but placing the potentially thousands of them in the generic content folder would make it more difficult to manage.
The Resource Strings Module is now available in the Sitecore Marketplace with full source code.
This should help you get started. If you are using Sitecore 7 you may want to take advantage of LINQ in Sitecore over FAST to make the code more readable and to piggy back on any optimizations Sitecore makes in the LINQ Provider.
The alternative is to create a folder underneath each site in a Multi-Site solution called ResourceStrings.
Under this folder you can arrange your resource strings by SubLayout name and/or whichever folder structure makes sense to make them easier to find.
If you use a fast query to find them then as long as the resource string name is unique you can place them wherever you want or reorganize them later as you please.
public static string Translate(string key)
{
string itemPath = "FAST_" + Context.Language + "_" + Context.Site.ContentStartPath + "/ResourceStrings//*[@Key = '" + key + "']";
if (CacheManager.GetData(itemPath) != null)
{
return CacheManager.GetData(itemPath) as string;
}
string result = string.Empty;
Sitecore.Data.Items.Item[] dictionaryItems = Sitecore.Context.Database.
SelectItems("fast:" + Sitecore.Context.Site.ContentStartPath + "/ResourceStrings//*[@Key = '" + key + "']");
if (dictionaryItems != null && dictionaryItems.Length > 0)
{
// bad entry should fail gracefully.
try
{
result = dictionaryItems[0].Fields["Phrase"].Value;
}
catch
{
result = string.Empty;
}
}
CacheManager.Add(itemPath, result, CacheItemPriority.Normal, null, new SlidingTime(TimeSpan.FromSeconds(SiteSettings.ItemCacheInSeconds)));
return result;
}
Note that this example uses CacheManager. This is simply the Microsoft Practices Cache Manager.
In order to support the content editor you would need to wrap the controls you are using to display them in sc:editframe I am actually working on a QuickStart Package that would include a series of controls that loosely wrap the standard Sitecore and .NET controls with the ability to supply a resource string.
The Resource Strings Module is now available in the Sitecore Marketplace with full source code.
This should help you get started. If you are using Sitecore 7 you may want to take advantage of LINQ in Sitecore over FAST to make the code more readable and to piggy back on any optimizations Sitecore makes in the LINQ Provider.
If you have any tips, tricks or resources you want to share with the Guild or simply have a Sitecore question email me at sitecoreguild@outlook.com or chris.williams@threepointturn.com
Sunday, March 10, 2013
QuickStart: Installing Sitecore Packages Via the Sitecore Admin
Sitecore Rocks is an amazing tool that allows you to do a large amount of tasks from Visual Studio. In the last article about Creating a Sitecore Instance Using Sitecore Rocks that we can install Sitecore Packages right from inside Visual Studio. There is also a Product from Hedgehog called Team Development that will simplify the deployment of your solution. However, sometimes you cannot use Sitecore Rocks to install Sitecore Packages or Hedgehog's Team Development for Deployment either for Security reasons or some other good reason. If this happens, here is an alternative means to install a Sitecore Package.
Step 1: Open the browser and navigate to {website root}/sitecore/login
Make sure you click on options to show login options and click on desktop. Enter the username and password and click login

Sometimes when you click login you may get this message, "Access to the path 'c:\inetpub\wwwroot\sitecorequickstarts\website\sitecore\shell\applications\debug' is denied.". The solution is to go to open Windows Explorer and navigate to the project directory (eg. c:\inetpub\wwwroot\sitecorequickstarts) and right click. Click on properties. There will be a user called IIS_IUSR_{something} Ensure this user has full control of the site and click apply.

Step 2: If you have access to the server Sitecore Folder you can save yourself some time. Sitecore Packages are stored in the data\packages folder underneath your Sitecore Instance. eg. c:\inetpub\wwwroot\sitecorequickstart\data\packages
You can copy all your packages to this folder using windows explorer. This will avoid possible upload issues with the browser. If you have copied the packages then you can bypass all the upload steps and go directly to Step 12.
Step 3: Click on the Sitecore menu then click on Development Tools then Installation Wizard.

Step 4: When the wizard comes up click next

Step 5: If you copied all the packages to the package folder you can skip to Step 11.
If you have not uploaded the package yet then click upload. This will launch the upload wizard.

Step 6: Click next

Step 7: Click on Choose File

Step 8: Choose the package to upload and click OK

Step 9: You will see your package listed. If you have more packages you could choose to pick additional files. When done click next.

Step 10: If you are re-uploading any packages then ensure you check overwrite existing files and click next.

Step 11: The package gets uploaded and then tells you its done. Click Finish.

Step 12: Click on browse


Step 14: You will see the name of your package in the textbox click next

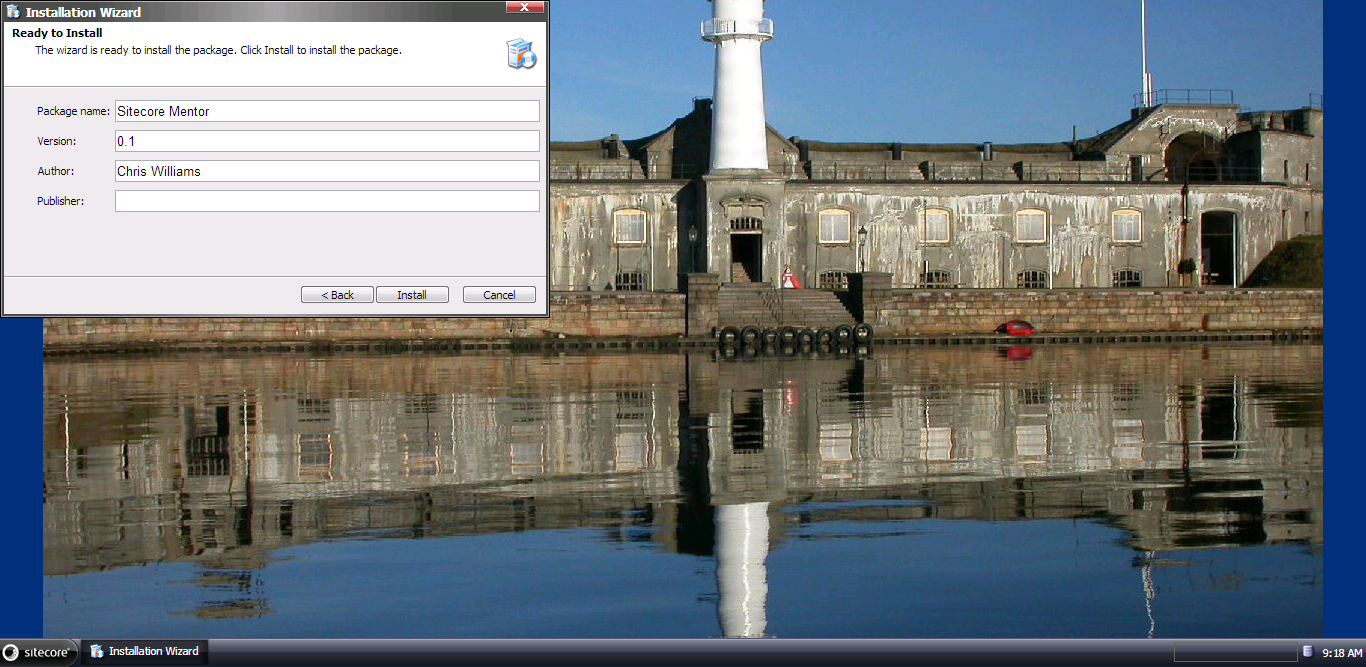
Step 14: Sitecore will provide you with information to confirm its the right package. If it looks right click Install.
Step 15: Sitecore will install the content tree and physical files.

Step 16: If this is a new package it will probably install without prompt, however if this is an update you may get prompted for additional decisions on how to deploy the package. If the install starts but then the screen goes grey and you get nothing. Possibly popup blockers are turned on. In chrome that is in the top right corner by the address bar.

You may be prompted to replace physical files. Choose yes or no based on the file being overwritten.


Step 17: After Sitecore has completed installation of the package you will be prompted to restart Sitecore Client and or Sitecore Server. In most cases a Sitecore Client Restart is fine. If you require a sitecor Server Restart, then the provider of the package will probably notify you.

Sitecore Packages can make it really easy to install new components but extra care needs to be taken especially with content tree updates as it is really easy to accidentally remove or overwrite existing values.
I highly recommend that you take a look at Hedgehog Team Development for your deployment needs but it is nice to know you have an alternative to lean on when the need arises.
If you have any suggestions for a QuickStart or a tip, trick or resource that would help someone starting out with Sitecore, please email them to me at sitecoreguild@outlook.com
Friday, March 8, 2013
QuickStart: Creating a Sitcore Instance Using Sitecore Rocks in Visual Studio
If you have not installed Sitecore Rocks, please check out this blog post that describes how to Install Sitecore Rocks. After you have installed Sitecore Rocks this QuickStart will guide you through the process of creating your new Sitecore Instance.
Sitecore Rocks is an extremely valuable tool for starting a new project. Below are the steps for creating a new Sitecore Instance using Sitecore Rocks. First of all, the link below says "Creating a new Sitecore web site". More accurately, this link should read "Create a new Sitecore Instance". In most cases, the website created with this wizard will not be the one you use for your production websites. This will be discussed in future posts. Here are the steps for Creating a new Sitecore Instance using Sitecore Rocks and Visual Studio.
Step 1: Open Visual Studio and click on the Start Page. Click on the link that says "Create a new Sitecore web site"

Step 2: Click on the first step but do NOT click Execute yet. If you do you will get errors about required fields.

Step 3: On the right hand side you will see a box that says "Sitecore Zip File"

Step 4: You will be prompted to open the browser to sdn to download the zip file

Step 5: When the browser opens and you log in, choose your version of the product.

Step 6: Make sure when you download the version that you choose the zip file to install Sitecore Manually. This is highlighted in yellow. You will be prompted to accept the license agreement then the file will download.


Step 7. Once downloaded return to Visual Studio and click on the "Add File" Button.

Step 8: Browse to the location of your install and click OK

Step 9: On the right hand side Enter a "Project name". (This will be the parent folder name for your Sitecore instance)

Step 10: On the right hand side look for "Sitecore License" Click Add File to add the license file. Select the license file and click OK.


Step 13: Now that all the info is entered Click execute beside the first step.
Once completed you will see the green circle upon success.
Step 14: Click on step 2 and click execute to copy web files to your project folder.
Once completed you will see the green circle upon success.

Step 15: Click on step 3 and click execute to copy database files to the database folder.
Once completed you will see the green circle upon success.

Step 16. Click on step 4 and click on execute to copy the data folder from the build. The data folder contains the package, logs and license folder.

Step 17. Click on step 5 and click on execute to copy the license file into the license folder.

Step 18. Click on step 6 and click on execute to set the data folder entries in the web.config


Step 20: Click on step 8 and click on execute to set the file and folder permissions on your project folder.


Step 22. Click on step 10 and click execute to modify the connection strings


Step 24. Click on step 12 and click execute to Add the site to your host file.
NOTE: This sets up the default site with your project name eg. xyz.local. You will need to manually edit the host file for your actual host headers.

Step 25. Step 13 is a very important step. It installs the Sitecore Rocks Server Components. By doing this you open up Sitecore Rocks to allow you access to perform a larger number of tasks not supported by the standard Sitecore Web Services. Click on this step and click execute.

Step 26: Step 14 creates a connection on the client side (in Visual Studio) that will connect with the web services on your Sitecore project.

Step 27. Step 15 will install any Sitecore packages you listed in the package section. This component relies on Sitecore Rocks being setup and proper permissions to be provided. If you are getting error regarding timeouts or permissions you may want to unchecking this option and install the packages using the Sitecore Admin at the end. Alternatively you can read our next post on "Troubleshooting Issues Installing Packages Via Sitecore Rocks".

Step 28: Click On Step 16 and click execute. This will try and hit the keepalive.aspx page in Sitecore.

Step 29: Click on Step 18 and click execute. This will open a new browser and direct you to the Sitecore Admin page

Step 30: If you skipped installing the Sitecore Packages you can do so manually by following the steps in our article on installing Sitecore Packages.
If you have any suggestions for a QuickStart or a tip, trick or resource that would help someone starting out with Sitecore, please email them to me at chris.williams@readwatchcreate.com
Sitecore Rocks is an extremely valuable tool for starting a new project. Below are the steps for creating a new Sitecore Instance using Sitecore Rocks. First of all, the link below says "Creating a new Sitecore web site". More accurately, this link should read "Create a new Sitecore Instance". In most cases, the website created with this wizard will not be the one you use for your production websites. This will be discussed in future posts. Here are the steps for Creating a new Sitecore Instance using Sitecore Rocks and Visual Studio.
Step 1: Open Visual Studio and click on the Start Page. Click on the link that says "Create a new Sitecore web site"

Step 2: Click on the first step but do NOT click Execute yet. If you do you will get errors about required fields.

Step 3: On the right hand side you will see a box that says "Sitecore Zip File"
If you have already downloaded the Sitecore Install Zip file then skip to Step 7
otherwise click on the Download button:

Step 4: You will be prompted to open the browser to sdn to download the zip file

Step 5: When the browser opens and you log in, choose your version of the product.

Step 6: Make sure when you download the version that you choose the zip file to install Sitecore Manually. This is highlighted in yellow. You will be prompted to accept the license agreement then the file will download.


Step 7. Once downloaded return to Visual Studio and click on the "Add File" Button.

Step 8: Browse to the location of your install and click OK

Step 9: On the right hand side Enter a "Project name". (This will be the parent folder name for your Sitecore instance)

Step 10: On the right hand side look for "Sitecore License" Click Add File to add the license file. Select the license file and click OK.

11. Enter in the information about your SQL Server Instance

Step 12: Load any Packages you require for this build. Note: you can use repositories for your packages to share across the team. NOTE: This feature sometimes causes issues the first time using it. If this happens you can remove the packages here or simply skip the step later and manually upload your packages in the Sitecore Admin.

Step 13: Now that all the info is entered Click execute beside the first step.
Once completed you will see the green circle upon success.
Step 14: Click on step 2 and click execute to copy web files to your project folder.
Once completed you will see the green circle upon success.

Step 15: Click on step 3 and click execute to copy database files to the database folder.
Once completed you will see the green circle upon success.

Step 16. Click on step 4 and click on execute to copy the data folder from the build. The data folder contains the package, logs and license folder.

Step 17. Click on step 5 and click on execute to copy the license file into the license folder.

Step 18. Click on step 6 and click on execute to set the data folder entries in the web.config

Step 19. Click on step 7 and click on execute to copy the dms database and config files.

Step 20: Click on step 8 and click on execute to set the file and folder permissions on your project folder.

Step 21: Click on step 9 and click execute to attach the Sitecore databases to your instance.

Step 22. Click on step 10 and click execute to modify the connection strings

Step 23. Click on step 11 and click execute to Create the IIS Site. NOTE: This sets up the default site with your project name eg. xyz.local. You will need to manually set up IIS for your actual host headers.

Step 24. Click on step 12 and click execute to Add the site to your host file.
NOTE: This sets up the default site with your project name eg. xyz.local. You will need to manually edit the host file for your actual host headers.

Step 25. Step 13 is a very important step. It installs the Sitecore Rocks Server Components. By doing this you open up Sitecore Rocks to allow you access to perform a larger number of tasks not supported by the standard Sitecore Web Services. Click on this step and click execute.

Step 26: Step 14 creates a connection on the client side (in Visual Studio) that will connect with the web services on your Sitecore project.

Step 27. Step 15 will install any Sitecore packages you listed in the package section. This component relies on Sitecore Rocks being setup and proper permissions to be provided. If you are getting error regarding timeouts or permissions you may want to unchecking this option and install the packages using the Sitecore Admin at the end. Alternatively you can read our next post on "Troubleshooting Issues Installing Packages Via Sitecore Rocks".

Step 28: Click On Step 16 and click execute. This will try and hit the keepalive.aspx page in Sitecore.

Step 29: Click on Step 18 and click execute. This will open a new browser and direct you to the Sitecore Admin page

Step 30: If you skipped installing the Sitecore Packages you can do so manually by following the steps in our article on installing Sitecore Packages.
If you have any suggestions for a QuickStart or a tip, trick or resource that would help someone starting out with Sitecore, please email them to me at chris.williams@readwatchcreate.com
Subscribe to:
Posts (Atom)